MOSIP Integration Demo with DHIS2


The DHIS2 core team recently collaborated with MOSIP, HISP Sri Lanka, and Symbionix on an interesting demo of an ID provider integration with DHIS2 that we're excited to share. MOSIP develops open-source ID provider services, a valuable part of digital public infrastructure, and the intention of this project is to show an integration between MOSIP and DHIS2, where both patients and health care providers can verify their identity with a common ID provider service. This demo integration also incorporates a shared electronic health registry (EHR), and demonstrates how using the EHR and a common ID provider across different digital health services can promote continuity of data across the health sector.
The use case
Background
In order to demonstrate an integration with an ID provider, a realistic use case was chosen as a foundation: an antenatal care (ANC) program that matches that used in Sri Lanka. The use case covers a patient's journey across three types of services, tied together by a shared EHR (the National EHR, or NEHR, in this demo) and a common ID provider service:
- A Public Health Midwife (PHM) clinic, where the patient is enrolled into a DHIS2 ANC program and ANC events are recorded
- A Patient Portal, where the patient can log in to see their own health records
- A Clinician Portal, where specialists at other facilities can search for patients' histories when patients are referred to them
eSignet, an OIDC provider developed by MOSIP, features prominently in this use case. It's used both for users to log in to services using their national ID, and to verify a patient at the point of care.
To support the continuity of data across the three services, there are three ways patients can be uniquely identified:
- Their national ID, which is purely optional. If the patient doesn't want to share it for whatever reason, one of the following options can be used.
- A Personal Health Number (PHN): a human-friendly code that can identify a patient in the health care system without use of their national ID. One can be generated by any authorized clinic.
- eSignet also provides a unique identifier for a person in the ID system, which is separate from their national ID used to verify themself. This is a more machine-friendly value that can be used to uniquely identify a person in a domain without using their national ID.
The full patient journey
The following is the full patient journey in this ANC use case:
- A pregnant mother arrives at a PHM clinic.
- The PHM logs into DHIS2 using eSignet, using their national ID to authenticate.
- In the Capture app, the ANC enrollment form has a button to let the patient use eSignet to verify their identity and authorize use of some of their personal info.
- A PHN can either be generated for the patient, or an existing one can be used.
- Behind the scenes, eSignet's unique (non-national ID) identifier is also saved for the patient.
- The national ID is optional to share here.
- The clinic worker then completes the enrollment, and can enter data for other ANC stages.
- Enrollment and other program stages can be completed in DHIS2.
- Each time a patient’s data is updated in DHIS2, it’s synced to a National Electronic Health Registry (NEHR), which is shared across the digital services in the health domain
- Later, the mother can visit a Patient Portal website, where they can log in using eSignet. Once verified, they can view their health history in the NEHR, again without needing to share their national ID if they don't want to.
- When the mother is referred to a specialist later, a specialist clinician can use a Clinician Portal website to search the NEHR for the patient's previous history to continue care.
Now that the use case is laid out, the rest of this article will focus on the technical aspects of enabling this patient journey. To see what the steps of the journey look like in practice, have a look at the short videos in the sections describing those features.
The integration
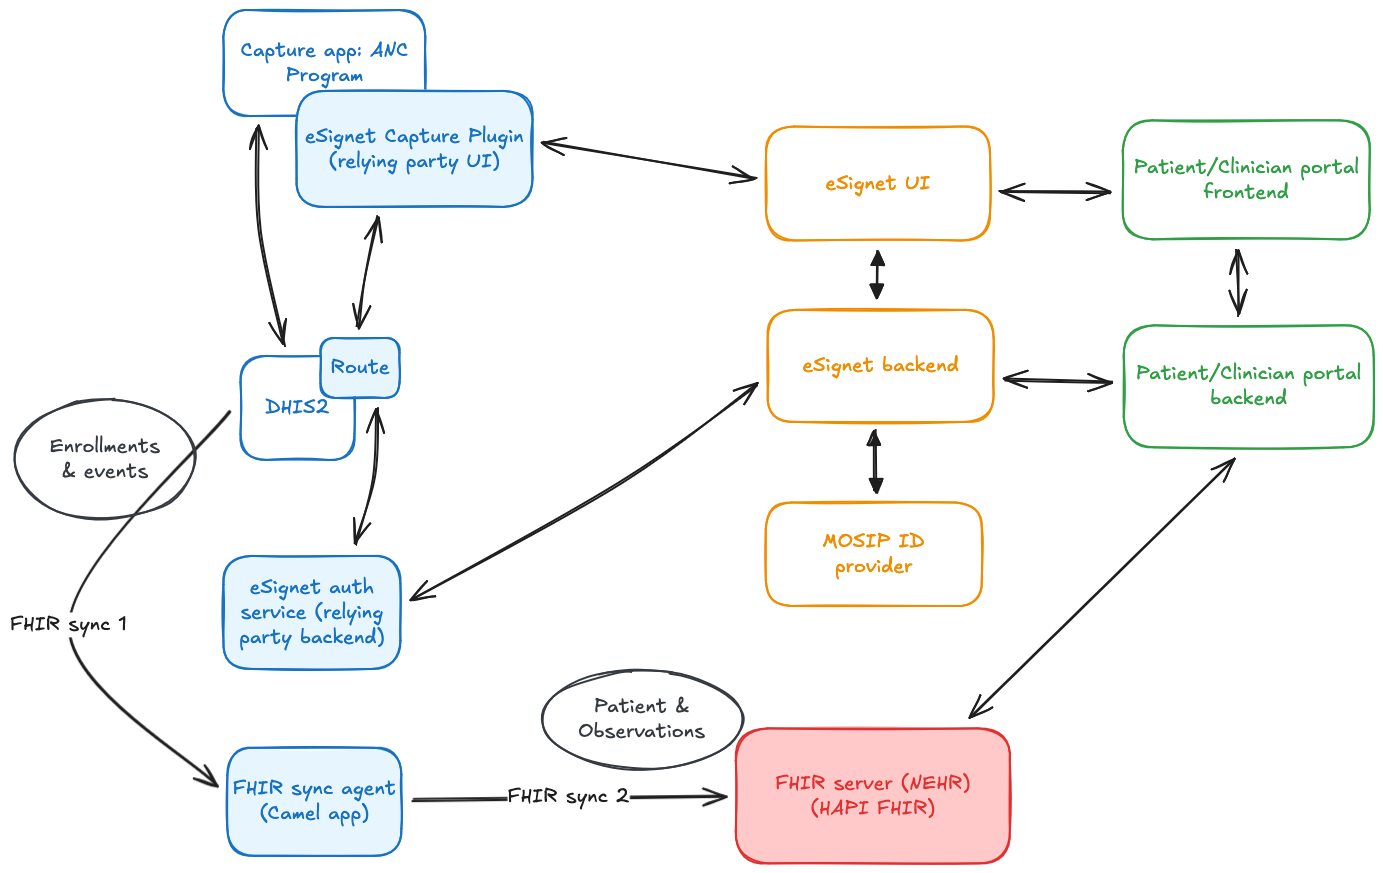
To achieve this integration, the following components were set up, as shown in the diagram above:
- A DHIS2 instance, customized to use eSignet as an OIDC provider for user login
- Several components to enable the OIDC flow for patient verification in the Capture app:
- A data entry form field plugin for the Capture app, which handles the front-end portion of the OIDC flow
- A backend eSignet auth service, which handles the back-channel portion of the OIDC flow
- A route, which is used to securely connect the Capture plugin to the backend eSignet auth service
- An NEHR, a FHIR server modeled after the one designed in Sri Lanka. It uses a custom Patient profile.
- A Patient Portal, where a patient can log in using eSignet to see their data from the NEHR
- A Clinician Portal, where a clinician can search the NEHR for the history of a patient that's been referred to them
The eSignet components and MOSIP ID provider services are hosted at MOSIP's Collab environment.
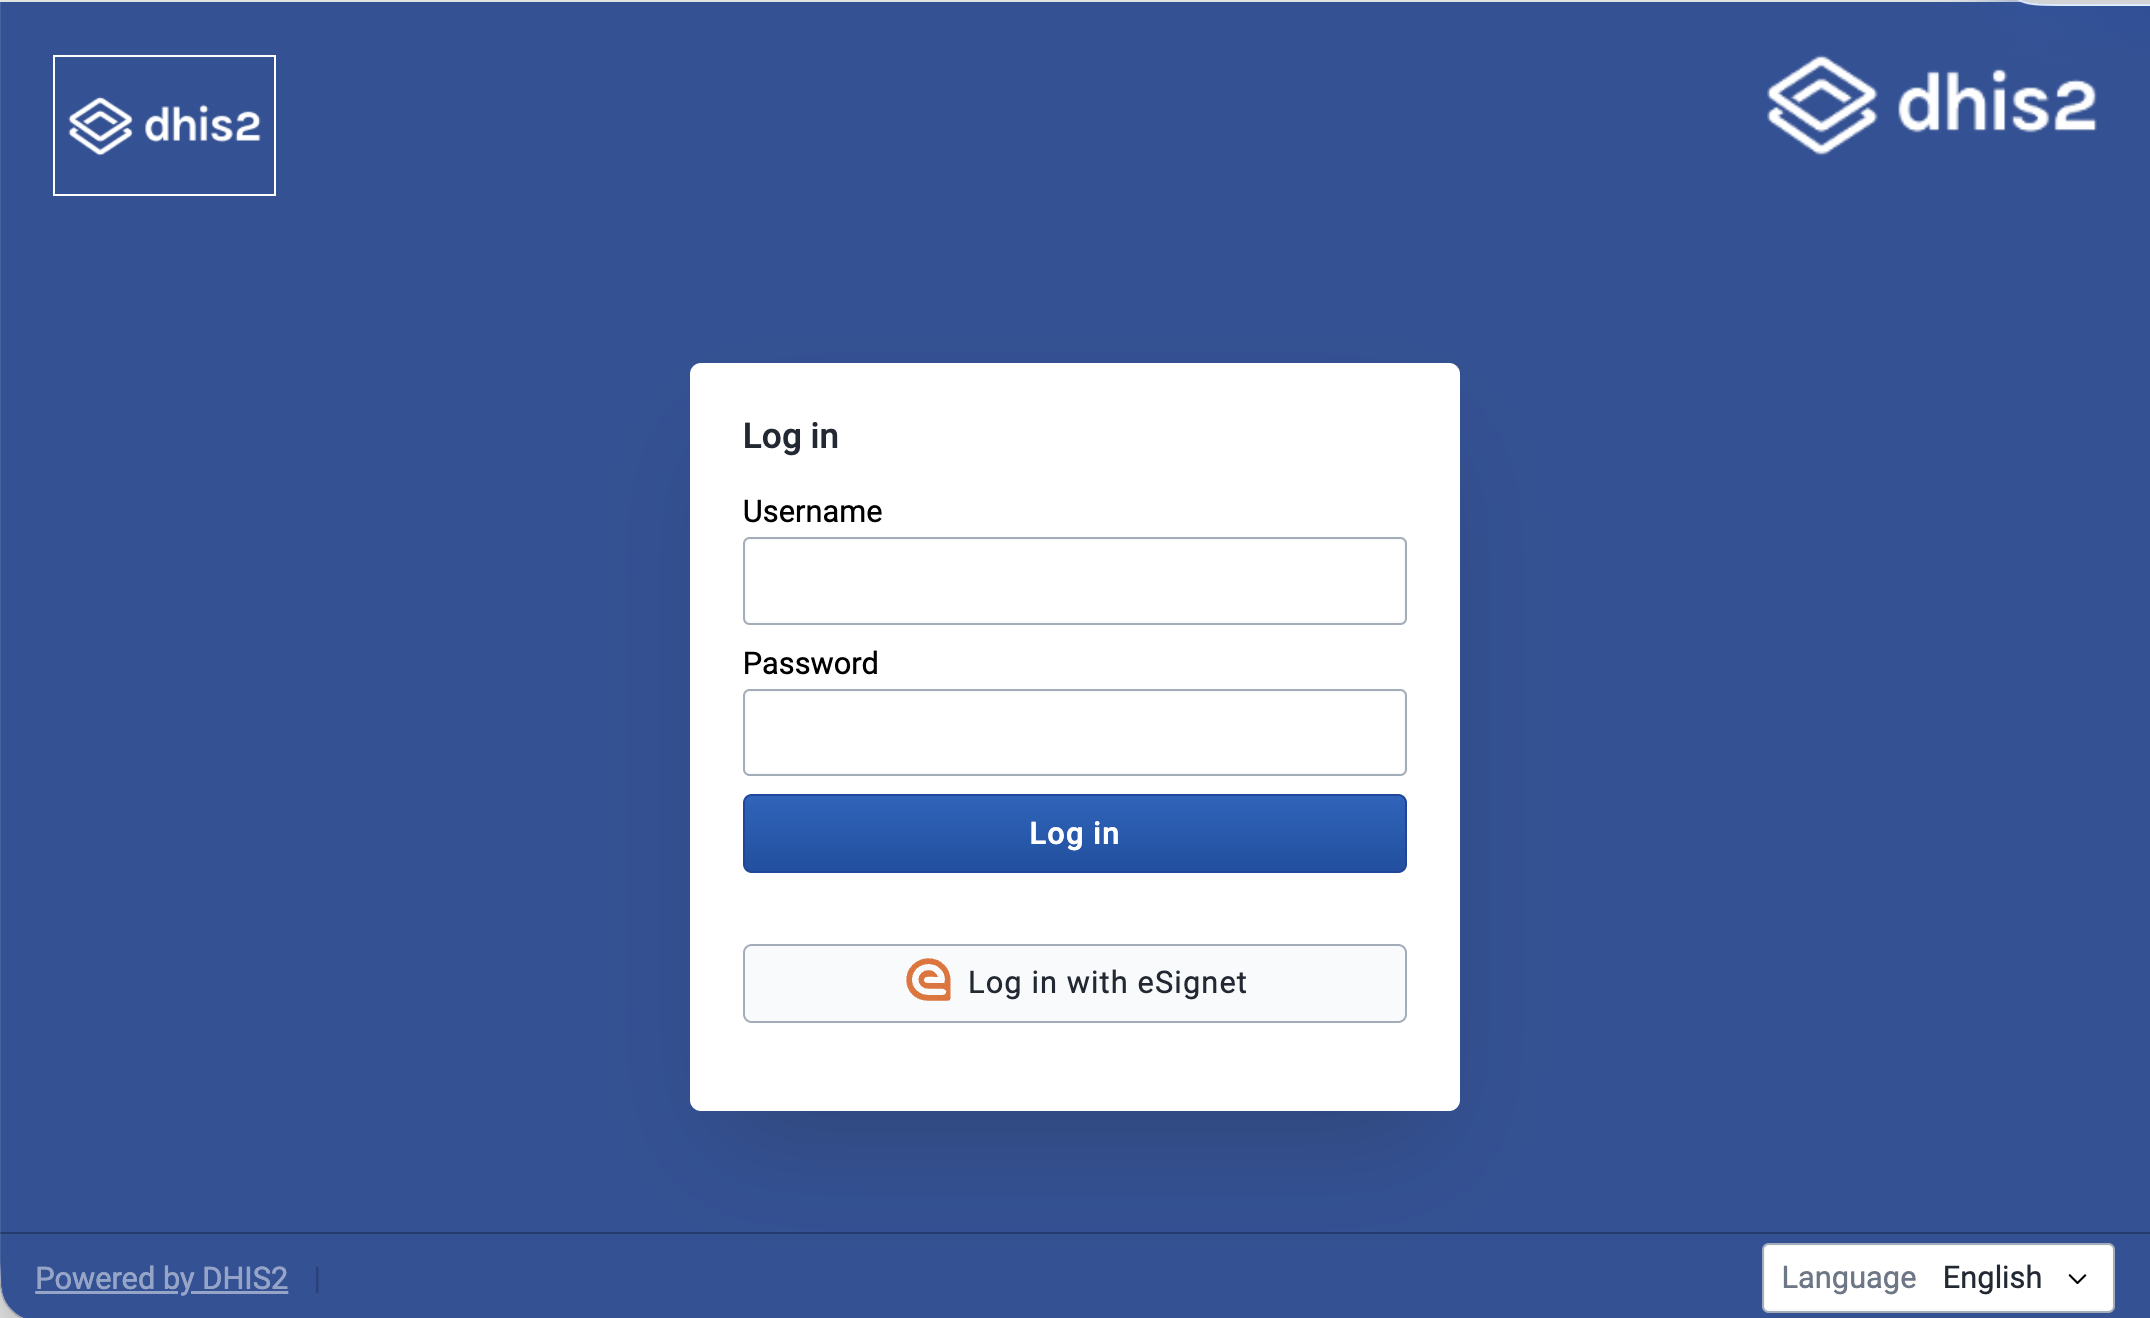
DHIS2 login using eSignet
At the time of working on this integration demo, DHIS2 supports logging in using an OIDC flow from a few providers (Google, Azure, WSO2, and Okta), and also has some generic support for other OIDC providers, if they fit some constraints.
A couple of eSignet’s features weren’t those that were generically supported by DHIS2, however, so a couple changes had to be made specially for this case:
- eSignet uses
private_key_jwtas its authentication method, which had to be added to the generic provider support. - The
userInforesponse from eSignet is a signed JWT, which needed a verification step to be added. - X509 thumbprints were added to the public keys shown on the DHIS2 instance to match the server-side keys.
These features will soon be added to the core in a generic way, so more people can take advantage of them.
Other than that, setting up eSignet as an OIDC login provider for DHIS2 was the same as for other generic providers:
- A Java key store was generated using the Java
keytoolutil:keytool -genkey -alias {key-alias} -keyalg RSA -keystore {keystore-filename}.jks -storepass {keystore-pass} -keypass {key-pass}(replace the values in braces{}with your own). - An eSignet icon is added to
dhis-web-commonsto use on the login page button. - DHIS2 configuration for the OIDC login was set up in
dhis.conf, which looks like the snippet below. - DHIS2 was registered as a client for the eSignet provider, using a public key from DHIS2’s well-known endpoint.
At that point, after restarting the server, login using eSignet was ready to go.
oauth2.server.enabled = on

# Enables JWT Bearer tokens usage
oidc.jwt.token.authentication.enabled = on

# Enables OIDC login
oidc.oauth2.login.enabled = on

# eSignet variables:
oidc.provider.esignet.client_id = {client-id}
oidc.provider.esignet.client_secret = my-client-secret # Not used for the private_key_jwt auth method
oidc.provider.esignet.mapping_claim = email
oidc.provider.esignet.scopes = profile openid
oidc.provider.esignet.authorization_uri = https://esignet-mosipid.collab.mosip.net/authorize
oidc.provider.esignet.token_uri = https://esignet-mosipid.collab.mosip.net/v1/esignet/oauth/v2/token
oidc.provider.esignet.user_info_uri = https://esignet-mosipid.collab.mosip.net/v1/esignet/oidc/userinfo
oidc.provider.esignet.issuer_uri = https://esignet-mosipid.collab.mosip.net/v1/esignet
oidc.provider.esignet.jwk_uri = https://esignet-mosipid.collab.mosip.net/.well-known/jwks.json
oidc.provider.esignet.client_authentication_method = private_key_jwt
oidc.provider.esignet.keystore_path = {path-to-keystore}
oidc.provider.esignet.keystore_password = {keystore-pass}
oidc.provider.esignet.key_alias = {key-alias}
oidc.provider.esignet.key_password = {key-pass}
oidc.provider.esignet.jwk_set_url = https://mosip.integration.dhis2.org/api/publicKeys/esignet/jwks.json
oidc.provider.esignet.redirect_url = https://mosip.integration.dhis2.org/oauth2/code/esignet
oidc.provider.esignet.display_alias = Log in with eSignet
oidc.provider.esignet.login_image = /dhis-web-commons/oidc/esignet.svg
Capture plugin for eSignet verification for patient
For the next step in the patient journey, the ANC clinic worker will enroll the patient in the DHIS2 ANC program. At this stage, the patient can use eSignet to verify their identity using their national ID, and autofill several fields in the form at the same time.
In the real world, this is imagined as the clinic worker handing the device over to the patient, who types in their ID, then receives a one-time password (or other two-factor authentication method) on their personal device, which they can use to finish the flow on the clinic’s device. Then they can choose which personal info values from the ID system they authorize DHIS2 to access. Once complete, the patient will be verified, and fields in the enrollment form will be filled. Note: other flows can be used for real-world use cases, like sending a link to the user’s device to go through the whole flow there.
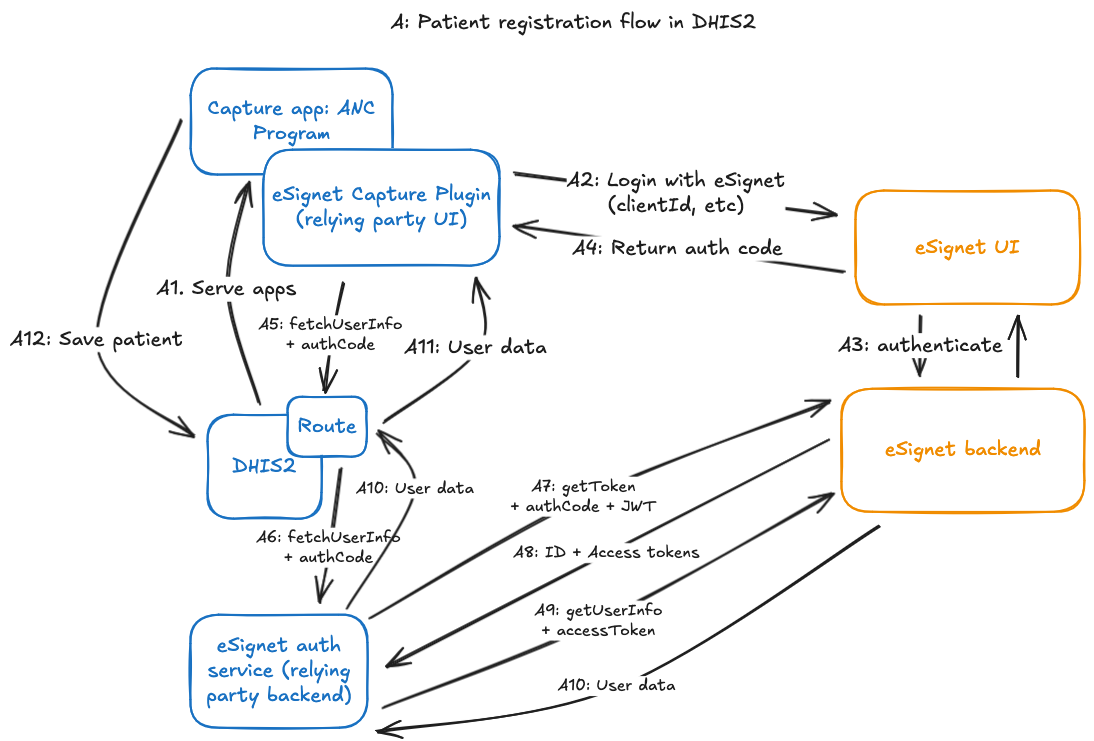
The eSignet verification flow from the Capture app is accomplished by several components to orchestrate the OIDC verification flow, as shown in the diagram below:
- A Capture form field plugin renders the “Verify with National ID” button and kicks off the OIDC flow when clicked.
- This opens a new window to save the Capture app form state, and points it to the eSignet UI to start the front-end portion of the OIDC flow.
- When the user finishes verification in the eSignet UI, they’ll get redirected to a page in the plugin app, which will capture the authorization grant that eSignet attaches to the redirected URL.
- Then, it will use a Route to send on that authorization grant to the backend eSignet auth service which will continue the back-channel portion of the OIDC flow.
- The backend eSignet auth service continues the back-channel portion of the OIDC flow:
- It uses the private key set up for this client (configured independently from the DHIS2 login) to:
- use the authorization grant returned from the frontend to retrieve an access token for the authenticated patient, then
- use the access token to retrieve demographic information about the patient (name, email, etc.)
- (Note: for the purposes of this demo, we were able to use the docker image of MOSIP’s mock relying party backend service, providing necessary variables as environment variables)
- It uses the private key set up for this client (configured independently from the DHIS2 login) to:
The user info for the patient is then returned as the result of the request to the Route, which can then be used to populate the fields in the enrollment form.
Behind the scenes, once the patient's information is returned to populate the field, eSignet's unique identifier for the person -- the sub property of the userInfo returned by the OIDC flow -- is saved as an attribute on the tracked entity using a hidden field in the enrollment form.
After that, another plugin in the form lets the clinic worker generate a PHN for the patient or use an existing one.
FHIR Sync Agent
The FHIR Sync Agent is a small Java application powered by Apache Camel that mirrors the ANC enrollments from DHIS2 to NEHR as FHIR patients. More concretely, the agent:
- listens for new or updated tracked entity IDs in the DHIS2 database,
- fetches the new or updated tracked entity by its ID from the DHIS2 Web API,
- translates the entity into a FHIR Patient resource, and then
- upserts the FHIR resource in a HAPI FHIR server that conforms to the Sri Lanka NEHR FHIR Implementation Guide
Let us dive into the above sequence of actions.
The synchronisation is kicked off from the DHIS2 database thanks to PostgreSQL logical replication. The database notifies the agent when a tracked entity is created or updated. The notification carries the ID of the tracked entity which the agent uses to call the DHIS2 Web API and fetch the tracked entity. This tracked entity, which includes enrollments and attributes, becomes the source of truth for the subsequent transformation that follows.
In this demo, the transformation is unidirectional: DHIS2 is the source while the FHIR server is the target. The agent needs to transform the tracked entity into FHIR resources that conform with the structure and semantics defined in the Sri Lanka NEHR Implementation Guide. Most of the tracked entity attributes map directly to a FHIR Patient resource. Additional clinical data within attributes is mapped into Observation resources and linked to the Patient. The Patient resource acts as the anchor for the rest of the mapped resources, so they are linked back to the same patient to preserve the data model from DHIS2. Tracker program stages contain most of the clinical data. Each completed event results in a FHIR Encounter, with Observation resources created from program stage data elements and linked back to that encounter and patient. These resources are then pushed to the NEHR-compliant FHIR server, where they are used by the patient and clinical portals.
The transformation itself is implemented with DataSonnet: a Java flavour of Jsonnet for declaratively mapping JSON. Expressing complex mappings between DHIS2 and FHIR resources in DataSonnet allowed us to stay away from writing low-level Java transformation code. The main DataSonnet mapping definition constructs identifiers, iterates over relevant program stage events, and imports DataSonnet libraries to transform the events into individual FHIR resources which are then assembled into a FHIR bundle within the main mapping definition. A simplified version of this mapping definition is shown below:
// fhirBundle.ds

// Import resource-level mappers from DataSonnet modules
import patient_entry, practitioner, encounter, registration, visit, referral

phn    = attr(body, PHN_ATTR_UID)
events = completedEvents(body)

entries(tei) =
    patient(tei)
  + practitioner(tei.updatedBy)
  + for ev in events:
        encounter(phn, ev)
      + registration(phn, ev)
      + visit(phn, ev)
      + referral(phn, ev)

{
  resourceType: "Bundle",
  type: "transaction",
  entry: entries(body)
}
All domain-specific mapping lives in the imported DataSonnet modules. We designed the transformation layer with each *.libsonnet module mapping a single concern and mirroring the FHIR resource it produces. There are modules for patient, practitioners, encounters, registrations, visits and referrals. Each module takes a tracked entity, enrollment, or event as input and returns one or more FHIR resources. The modules also contain helpers for concatenating values with IDs before constructing FHIR resources.
As an example, an abridged version of the patient module used is shown below:
// patientResource.libsonnet

{
  patient_entry(ds, tei)::

    // Attribute UIDs (examples)
    local ATTR_FULLNAME = "VQl0wK3eqiw";
    local ATTR_PHN      = "IrUmPkFMDU5";
    local ATTR_DOB      = "Yie7mOY913J";
    local ATTR_GENDER   = "p7zizFkC6Lv";

    // Helpers
    local getAttrById(uid) = ...;
    local parseName(fullName) = ...;

    {
      fullUrl: "urn:uuid:" + tei.trackedEntity,
      resource: {
        resourceType: "Patient",

        // NEHR profile
        meta: {
          profile: [
            "http://fhir.health.gov.lk/ips/StructureDefinition/ips-patient"
          ]
        },

        // Identifiers resolved from DHIS2 attributes
        identifier: [
          {
            system: "http://fhir.health.gov.lk/ips/identifier/phn",
            value: getAttrById(ATTR_PHN)
          }
        ],

        // Core demographics
        name: parseName(getAttrById(ATTR_FULLNAME)),
        birthDate: getAttrById(ATTR_DOB),
        gender: ds.lower(getAttrById(ATTR_GENDER))
      },

      // Idempotent upsert using NEHR PHN identifier
      request: {
        method: "PUT",
        url: "Patient?identifier=http://fhir.health.gov.lk/ips/identifier/phn|"
             + getAttrById(ATTR_PHN)
      }
    }
}
Visit, registration and referral mappings follow the same structure. Event data elements are turned into clinical resources (e.g., Observation) and linked back to both the encounter and the patient. The DataSonnet script then assembles the bundle, while modules define and populate the structure of each resource.
This structure worked well for the demo. The mappings are easy to set up, and changes tend to stay local to a single file. The transformation layer stays decoupled from the Camel route logic of the fhir-sync-agent. Adding a new mapping usually means writing a Jsonnet module and including it in the DataSonnet entry point. It is also easier to test due to this decoupling. Example tracker payloads can be run through the transformation and validated against expected FHIR output at both resource and bundle level, which made the NEHR alignment validation easier.
Due to this decoupling, it is also easier to test. Example tracker payloads can be run through the transformation and validated against expected FHIR output at both resource and bundle level, which made the NEHR alignment validation easier.
Patient & Clinician Portals
Once patient data is synced to the NEHR, other services can take advantage of it too. The team at Symbionix developed a patient portal, where a patient can use eSignet to log in to the portal and view their visit history; and a clinician portal, where a specialist clinician at another facility can search for a patient’s history.
Both portals are standalone web apps. The Patient Portal uses eSignet to allow patients to log in using their national ID and choose which ID data they want to share with the portal. Then, the Patient Portal searches for the patient’s information from the NEHR, using eSignet’s unique identifier for that person in the health domain, i.e. the sub value on the person’s userInfo payload returned from the OIDC auth flow. This makes it unnecessary for the patient to share their national ID with the portal if they don’t want to.
The NEHR returns FHIR resources for the patient (their summary, encounters, and observations), and the portal uses those to render the patient’s history.
In the Clinician Portal (a simulated EMR), a clinician can search for a patient in the NEHR by several parameters, including the PHN mentioned in the use case section above. The FHIR resources are collected from the NEHR and rendered as patient results, then a patient can be clicked on to view the patient’s history.
Next steps
The demo has been a successful proof of concept for an integration between DHIS2 and MOSIP’s identity provider services, and showcases good ways of taking advantage of that continuity of patient data across multiple health domain services.
To make such an integration easier in the future, there are several useful things that can be developed:
- Features to expand OIDC login for DHIS2 users, as mentioned above, so using eSignet for login is supported out-of-the-box
- A more generic plugin for verifying with eSignet in the Capture app
- A more generic relying party backend service for the back-channel part of the OIDC flow, that takes advantage of all of eSignet’s OIDC features
- Written guidance and documentation on setting up these components to make production integrations, including a fully-fledged reference implementation
- Advanced DHIS2 interoperability features:
- Data mapping at the Routes, for example to map User Info from eSignet to T.E. attribute values in DHIS2
- An eventing system for tracked entities
(The last two features combined would replace the need for the FHIR sync agent in the integration, by sending an event via a route that maps TE data to FHIR)
All these would be valuable as supports to DHIS2-MOSIP integrations, so they are in the wishlist for future development.
Closing thoughts
If you want to dive into the code and investigate the nitty gritty of the implementation, feel free to browse the reference repository for the integration to look into the code and the integration setup (although, disclaimer: the repository is not yet documented as of the publishing of the blog).
Finally, special thanks to MOSIP, HISP Sri Lanka, and Symbionix for collaborating on this project. This is an exciting integration, and we at DHIS2 look forward to more!